As you may already know, EMC VPLEX is the storage virtualization product from EMC, released in 2010.
I had the opportunity recently to install a EMC VPLEX for our lab setup. As I was not much familiar with VPEX , it was a challenging experience and there was a lot of learning too.. Thanks to EMC procedure generators too.

Hardware and cabling
The one we got is a VS2 single engine model in our lab. The hardware include a single engine (looks much like a CX4-240 SPE), a management server (a 1U server similar to the VNX Control Station) and a pair of SPSes (Standby Power Supplies).
The basic network connectivity for a VS2 single engine is as below. Power, the best practice as always, SPS inputs should be from 2 different UPS sources. SPS inturn will provide power the directors in the engine. Management server is having only single power input as this is not a single point of failure in data access.
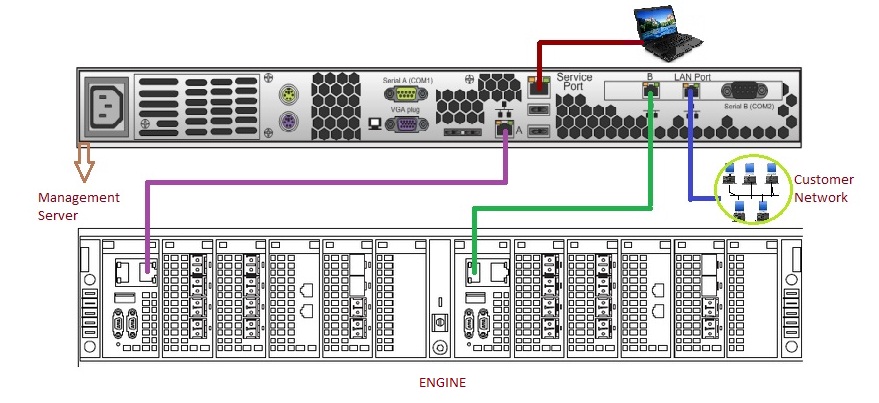
Once the cabling is completed, we can power ON the VPLEX. The directos will boot up from the internal FLASH drive . For initialization, we will use the Service port on the Management server and connect it to laptop directly.
Bringing cluster to network
Change the network settings as below. And then we are all set to access the Management Server.

Now the laptop will be able to communicate with the management server, whose default IP address is 128.221.252.2 . Have an SSH session to 128.221.252.2, via any terminal software like putty. SSH v2 is recommended and you may log the session output. Login with username service (refer EMC documentation for password).
Now as the first step of initialization, we can change the hostname for the VPLEX management server to the desired one.
sudo /opt/emc/VPlex/tools/ipconfig/changehostname.py -n [NewHostName]
As my cabling were as in above figure, my management server was able to communicate with the engines. Same was verified by pinging to their IPs (Director 1-A via 128.221.252.35 and Director 1-B via 128.221.252.36) from management server. Here director 1-A and 1-B are named as because they are from engine 1.
Now we can set the management IP address for the cluster. Telnet to the port 49500 to the management server from itself (i.e, telnet localhost 49500 ) to connect to the VPlexCLI. Once connected, run the below command to change management IP address.
management-server set-ip -i [IP Address: Net Mask] -g [gateway] eth3
Yes,.! I now have my cluster accessible from my network. We can have a putty session (SSH) to the newly assigned IP address to configure VPLEX. Credentials are the same service credentials . Connect to VPlexCLI,
telnet localhost 49500
configuration system-setup
will do the configuration of the VPlex cluster. You will be prompted to select the configuration type . i.e, Local, Metro or Geo. You will have to give the Call-home details etc.. too during the steps.
Now entering https://management_server_IP_address/ from browser will take you to the Unisphere for VPLEX screen, the one we were waiting for..!
Note : Mine was a Geo configuration, but the cluster connectivity was not in place. Also during the initialization, my backend storage connectivity was also not configured. Our target was to get the box initialized. Further posts regarding the configuration part will be coming soon..!